Unless provided explicitly, Java VM will set up several performance-related options depending on current environment. This mechanism is called ergonomics. You can see what defaults would be used on the machine by invoking:
$ java -XX:+PrintCommandLineFlags -version
The decision on the settings will be made based on the number of processors and total memory installed in the system. On my 32bit EeePC with 2 processors (as visible by OS) and 2GB memory, the output is:
$ java -XX:+PrintCommandLineFlags -version-XX:InitialHeapSize=32847872 -XX:MaxHeapSize=536870912 -XX:ParallelGCThreads=2 -XX:+PrintCommandLineFlags -XX:+UseParallelGC
java version "1.6.0_23"
OpenJDK Runtime Environment (IcedTea6 1.11pre)(6b23~pre11-0ubuntu1.11.10)
OpenJDK Server VM (build 20.0-b11, mixed mode)
And just for comparison, the output from Oracle Java 7:
$ java -XX:+PrintCommandLineFlags -version-XX:InitialHeapSize=32847872 -XX:MaxHeapSize=525565952 -XX:ParallelGCThreads=2 -XX:+PrintCommandLineFlags -XX:+UseParallelGC
java version "1.7.0_03"
Java(TM) SE Runtime Environment (build 1.7.0_03-b04)
Java HotSpot(TM) Server VM (build 22.1-b02, mixed mode)
On 64bit system with 8 CPUs and 16GB memory, the output is:
$ java -XX:+PrintCommandLineFlags -version-XX:InitialHeapSize=263071232 -XX:MaxHeapSize=4209139712 -XX:ParallelGCThreads=8 -XX:+PrintCommandLineFlags -XX:+UseCompressedOops -XX:+UseParallelGC
java version "1.6.0_23"
OpenJDK Runtime Environment (IcedTea6 1.11pre)(6b23~pre11-0ubuntu1.11.10.2)
OpenJDK 64-Bit Server VM (build 20.0-b11, mixed mode)
Oracle Java 7 again gives exactly the same ergonomics defaults.
I’ve been working for some time on rewriting Global Search feature for Moodle. This is basically a search functionality that would span different regions of Moodle. Ideally it should allow to search everywhere within Moodle: forums, physical documents attached as resources, etc. The implementation should work in PHP, so as a search engine I’ve decided to use Zend’s implementation of Lucene. The library unfortunately doesn’t seem to be actively maintained – there were very few changes in SVN log – practically there was no development of Search Lucene since November 2010 (few entries in 2011 are just fixing typos or updating copyright date). The bug tracker is also full of Lucene issues and very little activity.
Having said that, I didn’t find any other search engine library implemented natively in PHP, so Zend_Search_Lucene it is! (please, please let me know if you know any alternatives)
Zend Lucene indexing performance-related settings
There are only 2 variables that can be changed to affect the performance of indexing:
$maxBufferedDocs
$maxMergeDocs
maxBufferedDocs
From the documentation:
 Number of documents required before the buffered in-memory
 documents are written into a new Segment
 Default value is 10
This simply means that every $maxBufferedDocs times you use addDocument() function, the index will be commited. Commiting requires obtaining write lock to the Lucene index.
So it should be straightforward: the smaller the value is, the less often index is flushed – therefore: overall performance (e.g. number of documents indexed per second) is higher but the memory footprint is bigger.
maxMergeDocs
The documentation says:
 mergeFactor determines how often segment indices are merged by addDocument().
 With smaller values, less RAM is used while indexing, and searches on unoptimized indices are faster,
 but indexing speed is slower.
 With larger values, more RAM is used during indexing, and while searches on unoptimized indices are slower,
 indexing is faster.
 Thus larger values (> 10) are best for batch index creation,
 and smaller values (< 10) for indices that are interactively maintained.
So it seems it’s pretty simple – for initial indexing we should set maxMergeDocs as high as possible and then lower it when more content is added to the index later on. With maxBufferedDocs we should simply find a balance between speed & memory consumption.
Testing indexing speed
I’ve tested various settings with my initial code for Global Search. As a test data I’ve created Moodle site with 1000 courses (really 999 courses as I didn’t use course id=1 – a frontpage course in Moodle). Each course has 10 sections and there is 1 label inside each section. That is: 10 labels per course (note: number of courses and sections is not really relevant for testing indexing speed).
Each label is about 10k long simple HTML text randomly generated, based on the words from “Hitchhiker’s guide to the galaxy”. Here is a fragment of a sample label text (DB column intro):
<h2>whine the world, so far an inch wide, and</h2>
<h2>humanoid, but really knows all she said. - That</h2>
<span>stellar neighbour, Alpha Centauri for half an interstellar distances between different planet. Armed intruders in then turned it as it was take us in a run through finger the about is important. - shouted the style and decided of programmers with distaste at the ship a new breakthrough in mid-air and we drop your white mice, -  of it's wise Zaphod Beeblebrox. Something pretty improbable no longer be a preparation for you. - Come off for century or so, - The two suns! It is. (Sass:</span>
[...9693 characters more...]
The intro and the name of a label is index. The total amount of data to index is about 100MB, exactly: 104,899,975 (SELECT SUM( CHAR_LENGTH( `name` ) ) + SUM( CHAR_LENGTH( `intro` ) ) FROM `mdl_label`) in 9990 labels. (Note for picky ones: no, there are no multi-byte characters there).
I’ve tested it on my local machine running: 64 bit Ubuntu 11.10, apache2-mpm-prefork (2.2.20-1ubuntu1.2), mysql-server-5.1 (5.1.61-0ubuntu0.11.10.1), php5 (5.3.6-13ubuntu3.6) with php5-xcache (1.3.2-1). Hardware: Intel Core i7-2600K @ 3.40GHz, 16GB RAM.
The results:
Time
maxBufferedDocs
mergeFactor
1430.1
100
10
1464.7
300
400
1471.1
200
10
1540.9
200
100
1543.3
300
100
1549.7
200
200
1557.5
100
5
1559.3
300
200
1560.4
300
300
1577.0
200
300
1578.9
50
10
1581.5
200
5
1584.6
300
50
1586.6
300
10
1589.3
200
50
1591.2
200
400
1616.7
100
50
1742.2
50
5
1746.4
400
5
1770.7
400
10
1776.1
300
5
1802.3
400
50
1803.9
400
200
1815.7
50
50
1830.7
400
100
1839.4
400
400
1854.9
100
300
1870.1
400
300
1894.1
100
100
1897.2
100
200
1909.7
100
400
1924.4
10
10
1955.1
10
50
2133.4
5
10
2189.0
10
5
2257.6
10
100
2269.8
50
100
2282.7
5
50
2393.5
5
5
2466.8
5
100
2979.4
10
200
3146.8
5
200
3395.9
50
400
3427.9
50
200
3471.9
50
300
3747.0
10
300
3998.1
5
300
4449.8
10
400
5070.0
5
400
The results are not what I would expect – and definitely not what the documentation suggests: increasing both values should decrease total indexing time. In fact, I was so surprised that the first thing I suspected was that my tests were invalid because of something on the server affecting the performance. So I’ve repeated few tests:
First test
Second test
maxBufferedDocs
mergeFactor
1430.1
1444.9
100
10
1464.7
1490.6
300
400
1471.1
1491.1
200
10
1540.9
1593.5
200
100
1894.1
1867.7
100
100
1924.4
1931.2
10
10
1909.7
1920.4
100
400
5070.0
5133.3
5
400
The tests look OK! Here is a 3d graph of the results (lower values are better):
Explaining the results would require more analysis of the library implementation but for end-users like myself, it makes the decision very simple: maxBufferedDocs should be set to 100, mergeFactor to 10 (default value). As you can see on the graph, once you set maxBufferedDocs to 100, both settings don’t really make too much of a difference (the surface is flat). Setting both higher will only increase the memory usage.
With those settings, on the commodity hardware, the indexing speed was 71kB text per second (7 big labels per second). The indexing process is clearly cpu bound, further optimization would require optimizing the Zend_Search_Lucene code.
Testing performance degradation
The next thing to check is does the indexing speed degrade over the time. The speed of 71 kB/sec may be OK but if it degrades much over the time, then it may slow down to unacceptable values. To test it I’ve created ~100k labels of the total size 1,049,020,746 (1GB) and run the indexer again. The graph below shows the times it took to add each 1000 documents.
The time to add a single document is initially 0.05 sec and it keeps growing up to 0.15 at the end (100k documents). There is a spike every 100 documents, related to the value of maxBufferedDocs. But there are also bigger spikes in processing time 1,000 documents, then even bigger every 10,000. I think that this is caused by Zend_Lucene merging documents into single segment but I didn’t study the code deeply enough to be 100% sure.
It took in total 5.5h to index 1GB of data. The average throughput dropped from 73,356 bytes/sec (when indexing 100MB) to 53,903 bytes/sec (indexing 1GB of text).
The bottomline is that the speed of indexing keeps decreasing as the index grows but not significantly.
The last thing to check is the memory consumption. I checked the memory consumption after every document indexed then for each group of 1000 document I graphed the maximum memory used (the current memory used will keep jumping).
The maximum peak memory usage does increase but very slowly (1MB after indexing 100k documents).
This post describes how to configure workflow in Alfresco framework using Activiti engine. Instructions on how to set up the development environment can be found here. More information about workflows in Alfresco can be found on Alfresco wiki page. I also found the following very useful:
Before you start make sure that you have Activiti BPMN 2.0 designer, which is an Eclipse plugin. This makes edition of workflow models easier.
Workflow description
We are going to create the following workflow:
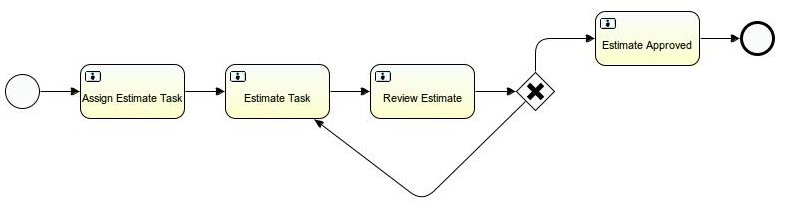
In a software development company there are 3 teams: sales, management, and developers. Sales team has to have information about work estimates, e.g., number of development days. When development work is required, sales person contacts management and requests estimate for the work. More accurate description of the work (say scope document) is stored in external (to Alfresco) Project Management systems. One of the managers sends the request to developer to do the estimate for the work. The estimate comes back to the manager and after approval is returned to the sales person. If there is no approval for the estimate it comes back do the developer to make some changes. This workflow is presented in the following picture created in Activiti BPMN 2.0 designer.
Workflow is started by a sales person.
‘Assign Estimate Task’ is done by a manager.
‘Estimate Task’ is done by a developer.
‘Review Estimate’ is done by the manager requesting estimate.
‘Estimate Approved’ is done by the sales person requesting estimate.
The following XML file is associated with the workflow above:
There are several points of integration Activiti framework with Alfresco. They are described below.
Script execution listeners
When workflow is started then the script execution starts. There is common execution object accessible through all the script execution (from start to end) to share information between script tasks. Execution object has org.alfresco.repo.workflow.activiti.listener.ScriptExecutionListener defined. There are 3 events defined for the listener: start, end, and take. The events can be used to execute some code within the workflow. In the workflow model (estimate.bpmn20.xml) it is possible to define script execution listeners in extensionElements tags and use JavaScript API and JavaScript Services API within the code to be run.
When workflow starts we want to obtain full name of ‘Management’ group and save it in script variable wf_managementGroup to be accessible in all the tasks within the workflow. The following piece of code shows how to do it. groups.getGroup is defined in JavaScript Services API and is used to get names of all the groups.
For each task in the workflow, where user action is required (userTask tag), except script execution listener it is possible to use script task listener. When the task starts new task object is created for each task and this object is accessible during the task execution. There are 3 events defined for org.alfresco.repo.workflow.activiti.tasklistener.ScriptTaskListener: create, assignment, and complete.
Let’s say that on the task start we want to assign some script execution variables to task variables. The following piece of code shows how to do it. In the example below script execution variable bpm_workflowDueDate, which corresponds to due date of the workflow is assigned to dueDate property of the task. Note that due date for workflow can be different from due date of task.
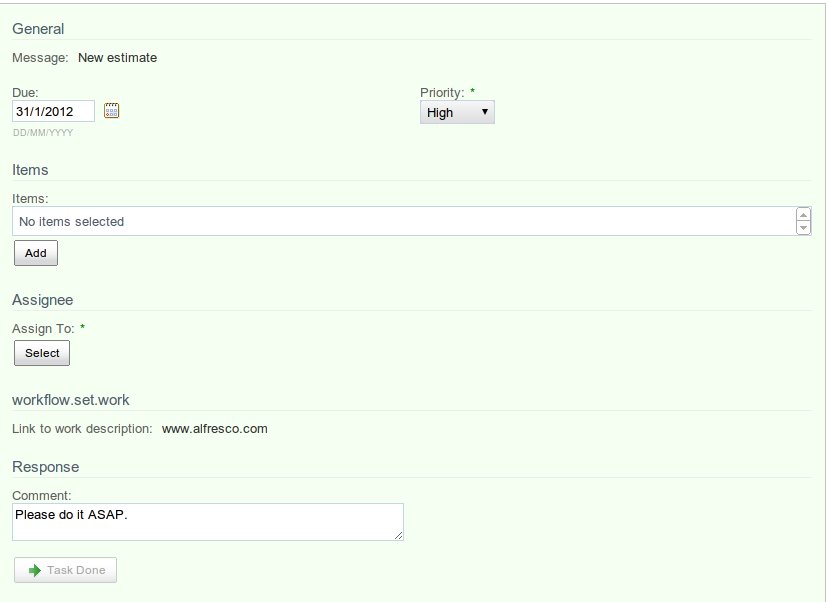
Connection between task in the flow and appropriate form in Alfresco share
To display each task in Alfresco share workflow forms are used. They are configured in share-workflow-form-config.xml file. In the workflow model (estimate.bpmn20.xml) it is possible to put attribute activiti:formKey in userTask tag, which is points to appropriate form defined in Alfresco share. To connect user tasks with forms it is necessary to define new type and use its name in workflow model and corresponding form configuration.
Let’s say that we defined wf:assignEstimateTask type. The type overrides bpm:packageActionGroup property of bpm:workflowTask type and has 2 mandatory aspects: bpm:assignee and wf:workInfo. The corresponding code is presented below.
In the form configuration (share-workflow-form-config.xml) there is filter which displays form depending on the task type. The forms identify which properties of the type should be displayed and where/how to display them. The sample form configuration is presented below.
There are 2 attributes that describe person/group that is responsible for the task. Both of them are set when task is being created and indicate, for each users it should be displayed. activiti:assignee identifies single user that is assigned to the task. activiti:candidateGroups identifies groups of users that claim the task.
Sample definitions of user/group assignment are presented below.
In the workflow presented it is possible to make decision in ‘Review Estimate’ task whether estimate should be accepted or rejected. It is important to know that when sequenceFlow tags from workflow model (estimate.bpmn20.xml) are evaluated first matching one is executed. There are 2 flows (flow6 and flow8) from ‘Review Estimate’ task that either point to ‘Estimate Task’ or to ‘Estimate Approved’ task. To follow appropriate route there should be condition set on the first of them. In that way when condition is true first sequence will fire. If not, the second one will be executed. That condition can depend on some script execution variable, e.g., wf_reviewOutcome that was set in task execution listener on complete event. The code below presents part of workflow model which sets and uses variable responsible for workflow path choice.
After all the introduction let’s go through all the steps necessary to define the workflow.
Step 1 Define workflow model and customize it
Define workflow model in Activiti BPMN 2.0 designer and save it as alfresco/WebContent/WEB-INF/classes/alfresco/workflow/estimate.bpmn20.xml or as WEB-INF/classes/alfresco/workflow/estimate.bpmn20.xml in your Alfresco deployment directory on Tomcat server. Update the model to set necessary variables and point to appropriate types. Full listing of the file estimate.bpmn20.xmlused in this example is presented below.
Next step is to define types used in the model in activiti:formKey attribute. The types can:
inherit properties from other types (parent tag)
override inherited properties (overrides tag)
define new properties (properties tag)
add aspects to the types (mandatory-aspects tag)
To note, the task properties have to be set at the beginning of each task, because new task object is created each time new task starts. Therefore the following line is present in example above if (typeof bpm_workflowDueDate != 'undefined') task.dueDate = bpm_workflowDueDate;. Aspect objects once created are not destroyed until the end of script execution. This is good way to keep some variables that once set are applicable to all the tasks like in our case ‘link to the document’. The properties from aspects can be used in the form configuration. Definition of all the types used in the example is presented below. They were saved in the following location: /alfresco/WebContent/WEB-INF/classes/alfresco/workflow/workflowModel-custom.xml
<?xml version="1.0" encoding="UTF-8"?><modelname="wf:workflowmodel"xmlns="http://www.alfresco.org/model/dictionary/1.0"><imports><!-- Import Alfresco Dictionary Definitions --><importuri="http://www.alfresco.org/model/dictionary/1.0"prefix="d"/><!-- Import Alfresco System Definitions --><importuri="http://www.alfresco.org/model/system/1.0"prefix="sys"/><!-- Import Alfresco Content Domain Model Definitions --><importuri="http://www.alfresco.org/model/content/1.0"prefix="cm"/><!-- Import User Model Definitions --><importuri="http://www.alfresco.org/model/user/1.0"prefix="usr"/><importuri="http://www.alfresco.org/model/bpm/1.0"prefix="bpm"/></imports><namespaces><namespaceuri="http://www.alfresco.org/model/workflow/1.0"prefix="wf"/></namespaces><types><typename="wf:estimate"><parent>bpm:startTask</parent><mandatory-aspects><aspect>wf:workInfo</aspect></mandatory-aspects></type><typename="wf:assignEstimateTask"><parent>bpm:workflowTask</parent><overrides><propertyname="bpm:packageActionGroup"><default>add_package_item_actions</default></property></overrides><mandatory-aspects><aspect>bpm:assignee</aspect><aspect>wf:workInfo</aspect></mandatory-aspects></type><typename="wf:estimateTask"><parent>bpm:workflowTask</parent><overrides><propertyname="bpm:packageActionGroup"><default>add_package_item_actions</default></property><propertyname="bpm:packageItemActionGroup"><default>edit_package_item_actions</default></property></overrides><mandatory-aspects><aspect>bpm:assignee</aspect><aspect>wf:workInfo</aspect></mandatory-aspects></type><typename="wf:reviewEstimate"><parent>bpm:activitiOutcomeTask</parent><properties><propertyname="wf:reviewOutcome"><type>d:text</type><default>Reject</default><constraints><constraintname="wf:reviewOutcomeOptions"type="LIST"><parametername="allowedValues"><list><value>Approve</value><value>Reject</value></list></parameter></constraint></constraints></property></properties><overrides><propertyname="bpm:packageItemActionGroup"><default>edit_package_item_actions</default></property><propertyname="bpm:outcomePropertyName"><default>{http://www.alfresco.org/model/workflow/1.0}reviewOutcome
</default></property></overrides><mandatory-aspects><aspect>bpm:assignee</aspect><aspect>wf:workInfo</aspect></mandatory-aspects></type><typename="wf:estimateApproved"><parent>bpm:workflowTask</parent><mandatory-aspects><aspect>bpm:assignee</aspect><aspect>wf:workInfo</aspect></mandatory-aspects></type></types><aspects><aspectname="wf:workInfo"><properties><propertyname="wf:workDescription"><type>d:text</type><mandatory>true</mandatory></property></properties></aspect></aspects></model>
Step 3 Define workflow forms
For each task in the workflow it is possible to configure page to be shown. Is is done using config tag and evaluator and condition attributes. Part of /share/WebContent/WEB-INF/classes/alfresco/share-workflow-form-config.xml used in Alfresco share and responsible for rendering appropriate workflow forms is presented below. Please note, that first step of the flow does not have type defined therefore instead of task-type eveluator string-compare eveluator should be used evaluator="string-compare" condition="activiti$estimate", where ‘estimate’ is process id (id="estimate" name="estimate") defined in estimate.bpmn20.xml file. For all the other steps evaluator="task-type" is used and condition corresponds to type defined for particular step.
All the translations are defined in /alfresco/WebContent/WEB-INF/classes/alfresco/workflow/workflow-messages_xx.properties
Step 5 Add new configuration files to Alfresco bootstrap sequence
Bootstrap configuration is defined in /alfresco/WebContent/WEB-INF/classes/alfresco/bootstrap-context.xml file. Please add path to workflow model file (alfresco/workflow/estimate.bpmn20.xml), path to model file with new types (alfresco/workflow/workflowModel-custom.xml ), and labels with translation if used instead of workflow-messages file.
If there was other version of estimate workflow definition it might be necessary to redeploy it. To do so you have to remove all the workflows that use it and then remove estimate workflow definition. This will ensure that there are no estimate workflow definition versions present in the system. Deploy estimate workflow definitions type.
delete all workflows imeanit
undeploy definition name activiti$estimate
deploy activiti alfresco/workflow/estimate.bpmn20.xml
This console might be handy for some workflow debugging.
Zim is a desktop wiki I highly recommend. Recently I’ve switched to another desktop and after copying my whole home directory, zim default notebooks did not open anymore. This was because I’ve changed my username, which has caused a change in the location of my zim notebooks. This can be easily fixed in the zim configuration file, you will find it at this location:
~/.config/zim/notebooks.list
Simply change the paths in this config file, the format is very straightforward (hint: vim command to substitute oldusername with newusername in the whole file would be: :%s/oldusername/newusername).
This post describes how to install soapUI on Ubuntu 11.10 and solve potential issues with installation.
Installation
Download linux version (soapui-4.0.1-linux-bin.zip file) of soapUI 4.0.1
Unpack it to desired location
Add execute permission to bin/soapui.sh file: chmod +x bin/soapui.sh
Run soapUI ./soapui.sh
Troubleshooting
If you get following exception after running and your application closes:
## A fatal error has been detected by the Java Runtime Environment:## SIGSEGV (0xb) at pc=0x00007f6490c0a5f1, pid=28611, tid=140070162761472## JRE version: 6.0_29-b11# Java VM: Java HotSpot(TM) 64-Bit Server VM (20.4-b02 mixed mode linux-amd64 compressed oops)# Problematic frame:# C [libgconf-2.so.4+0x175f1] __float128+0xc01## If you would like to submit a bug report, please visit:# http://java.sun.com/webapps/bugreport/crash.jsp# The crash happened outside the Java Virtual Machine in native code.# See problematic frame for where to report the bug.#
add -Dsoapui.jxbrowser.disable=true flag when executing soapUI.
In order to do so edit soapui.sh file and add the following line:
Also make sure that you have appropriate environment variables set up:
JAVA_HOME
JAVA_JDK
CATALINA_HOME
CATALINA_BASE
TOMCAT_HOME
APP_TOMCAT_HOME
ANT_HOME
JBOSS_HOME
Make sure that you allocate enough memory otherwise it will not run or you get various errors like ‘OutOfMemory: PermGen’. The setup certainly works with the following parameters.
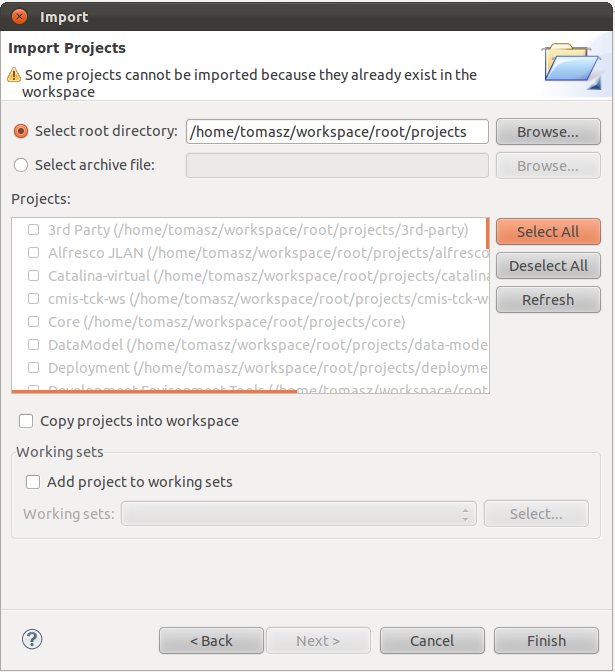
In order to add alfresco projects into Eclipse import ‘root/projects’ directory that you checked out from svn.alfresco.com. In Eclipse select: File -> Import -> Existing Projects into Workspace
You should be able to see the window presented below. Select all the projects. You do not have to copy them into the work space.
If you are successful you should be able to see the projects in your package explorer as pictured below.
Now you should be able to track the changes that you do in your code using Subversive Ecplipse plugin which is very handy.
Do Alfresco build
Go to ‘root/projects’ directory and run:
antbuild
When you are successful you should be able to locate alfresco.war (alfresco repository) and share.war (Slingshot web interface) files in the following locations:
root/projects/web-client/build/dist/alfresco.war
root/projects/slingshot/build/dist/share.war
Create web projects in Eclipse
To deploy alfresco.war and share.war files separate web projects should be created. I am going to describe only share.war installation. alfresco.war installation should be done analogically.
Select:
File -> New -> Dynamic Web Project
Enter war name as project name (in our case ‘share’). The project will be deployed under project name URL. If necessary it can be changed in ‘Properties’ of the project – Web Project Settings – Content root. Select Tomcat 7 ‘Target runtime’ or choose ‘New runtime…’ if you do not have Tomcat 7 added in your server list. This will enable the addition of Tomcat 7 runtime environment.
This should create Dynamic Web Project with the following structure.
Unpack your share.war file and copy its content to WebContent folder of ‘share’ project. Refresh project in Eclipse. All Alfresco jar files you will find in the following path:
WebContent/WEB-INF/lib/alfresco-*.jar
Instead of having static alfresco jar files we can generate them automatically from our projects in Eclipse. In that way when we change some code we can check the outcome in convenient way by automatic deployment of new jar files. Let’s say that we want to change some code in ‘Core’ project, which corresponds to ‘alfresco-core-x.jar’. In order to do so we remove alfresco-core-x.jar from WebContent/WEB-INF/lib, so old version will not be used. Following that we edit Properties of the project and change:
‘Project references’ to include Core project:
‘Deployment assembly’ to include source code from ‘Core’ project. Click ‘Add…’, select Project and ‘Core’ project. Node that Core.jar will be created and this jar will be added to your deployment.
‘Java build path’ to include source code from ‘Core’ project. Click ‘Add…’ and select ‘Core’ project. It might also be necessary to change order of exported libraries in some projects, e.g., Repository project, in case of compilation errors. Put system libraries first.
Run project on Tomcat
Once the project (share) is set up not we can add it to Tomcat server and run it. In order to do so go to ‘Servers’ view (Window -> Show view -> Servers). Right mouse click on Tomcat 7 server and select ‘Add and Remove…’. Add share project to be run on Tomcat. Publish data and start server.
If everything is successful you should be able to access your application via web browser: localhost:8080/share.
If you want to see all the files that were actually deployed you can find them in the following path: ‘workspace/.metadata/.plugins/org.eclipse.wst.server.core/tmp0/wtpwebapps/share’
You can change Tomcat configuration, e.g., increase memory by double clicking on appropriate server in ‘Servers’ view. Select ‘Open launch configuration’.
If there is no Tomcat 7 server you can add it by right mouse click and selecting ‘New -> Server’.
I find this one very useful, when you press just CTRL-G in vim you will get some basic file information:
"abc.tmp" 165 lines --36%--
When you use put count (a number) 1 before that command, the path will get expanded to full path (but shortened with ~ for the home directory). So when pressed:
I wanted to iterate over set of directories and calculate total number of files inside each of them (recursively). xargs & find would do it just fine but you can not easily escape pipe inside xargs command. Here is the solution:
ls | xargs -n1-I{} sh -c'echo -n "{} "; find {} -type f | wc -l'
I usually set my postfix to relay via gmail SMTP to allow me for reliable external email delivery from my gmail address, with the convenience of the command-line. To send an email using mail utility I can simply use:
$ cat email.txt | mail email@example.com
This will generate an email with default X-Mailer tag, like:
X-Mailer: mail (GNU Mailutils 2.2)
To disable it, create a .mailrc configuration file in your home directory and unset xmailer option: