Introduction
This post describes how to set up environment to be able to code and debug Alfresco on Tomcat in Eclipse.
To start with make sure you have downloaded and installed the following:
- Eclipse Indigo – download it here
- Tomcat 7.0 – download it here
- Sysdeo Eclipse Tomcat Launcher plugin – download it here
- Oracle Java JDK 1.6 – download it here
- Alfresco source code from svn.alfresco.com – follow the instructions here
- Subversive Ecplipse plugin
- Ant 1.7
Also make sure that you have appropriate environment variables set up:
- JAVA_HOME
- JAVA_JDK
- CATALINA_HOME
- CATALINA_BASE
- TOMCAT_HOME
- APP_TOMCAT_HOME
- ANT_HOME
- JBOSS_HOME
Make sure that you allocate enough memory otherwise it will not run or you get various errors like ‘OutOfMemory: PermGen’. The setup certainly works with the following parameters.
JAVA_OPTS="-XX:MaxPermSize=1024m -Xms512m -Xmx4096m"Import projects into Ecplise
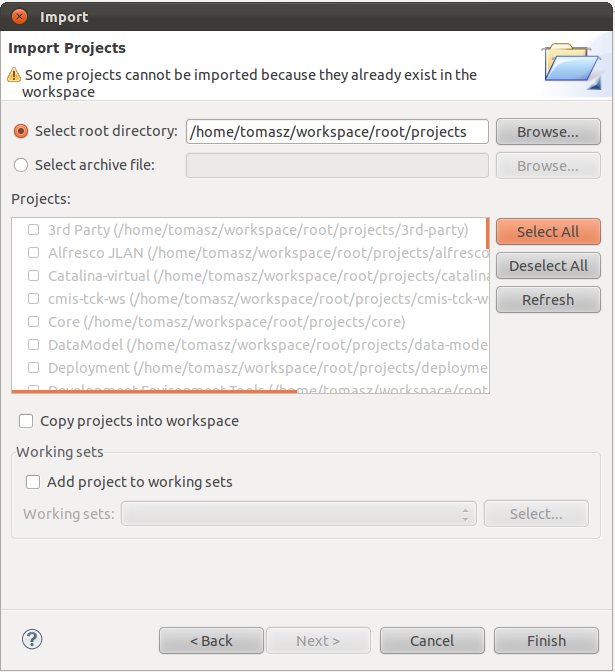
In order to add alfresco projects into Eclipse import ‘root/projects’ directory that you checked out from svn.alfresco.com. In Eclipse select: File -> Import -> Existing Projects into Workspace
You should be able to see the window presented below. Select all the projects. You do not have to copy them into the work space.
If you are successful you should be able to see the projects in your package explorer as pictured below.

Now you should be able to track the changes that you do in your code using Subversive Ecplipse plugin which is very handy.
Do Alfresco build
Go to ‘root/projects’ directory and run:
ant buildWhen you are successful you should be able to locate alfresco.war (alfresco repository) and share.war (Slingshot web interface) files in the following locations:
- root/projects/web-client/build/dist/alfresco.war
- root/projects/slingshot/build/dist/share.war
Create web projects in Eclipse
To deploy alfresco.war and share.war files separate web projects should be created. I am going to describe only share.war installation. alfresco.war installation should be done analogically.
Select:
File -> New -> Dynamic Web Project
Enter war name as project name (in our case ‘share’). The project will be deployed under project name URL. If necessary it can be changed in ‘Properties’ of the project – Web Project Settings – Content root. Select Tomcat 7 ‘Target runtime’ or choose ‘New runtime…’ if you do not have Tomcat 7 added in your server list. This will enable the addition of Tomcat 7 runtime environment.

This should create Dynamic Web Project with the following structure.

Unpack your share.war file and copy its content to WebContent folder of ‘share’ project. Refresh project in Eclipse. All Alfresco jar files you will find in the following path:
WebContent/WEB-INF/lib/alfresco-*.jar
Instead of having static alfresco jar files we can generate them automatically from our projects in Eclipse. In that way when we change some code we can check the outcome in convenient way by automatic deployment of new jar files. Let’s say that we want to change some code in ‘Core’ project, which corresponds to ‘alfresco-core-x.jar’. In order to do so we remove alfresco-core-x.jar from WebContent/WEB-INF/lib, so old version will not be used. Following that we edit Properties of the project and change:
‘Project references’ to include Core project:

‘Deployment assembly’ to include source code from ‘Core’ project. Click ‘Add…’, select Project and ‘Core’ project. Node that Core.jar will be created and this jar will be added to your deployment.

‘Java build path’ to include source code from ‘Core’ project. Click ‘Add…’ and select ‘Core’ project. It might also be necessary to change order of exported libraries in some projects, e.g., Repository project, in case of compilation errors. Put system libraries first.

Run project on Tomcat
Once the project (share) is set up not we can add it to Tomcat server and run it. In order to do so go to ‘Servers’ view (Window -> Show view -> Servers). Right mouse click on Tomcat 7 server and select ‘Add and Remove…’. Add share project to be run on Tomcat. Publish data and start server.

If everything is successful you should be able to access your application via web browser: localhost:8080/share.
If you want to see all the files that were actually deployed you can find them in the following path: ‘workspace/.metadata/.plugins/org.eclipse.wst.server.core/tmp0/wtpwebapps/share’
You can change Tomcat configuration, e.g., increase memory by double clicking on appropriate server in ‘Servers’ view. Select ‘Open launch configuration’.

If there is no Tomcat 7 server you can add it by right mouse click and selecting ‘New -> Server’.