Introduction
When developing web application set up of convenient development environment might be crucial for more efficient work. Let’s consider web application that uses following frameworks:
In addition we want to use Eclipse as our editor.
This tutorial presents initial setting of Eclipse project to support all the frameworks mentioned above and allow the convenient and fast application development of web application on Jetty server.
[ad#adsense]
Create Eclipse project
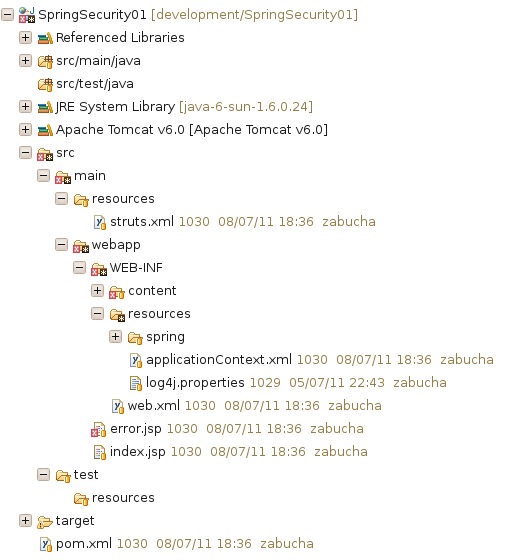
First step is to create Ecplise project, e.g., Dynamic Web Project, that would have the following structure:
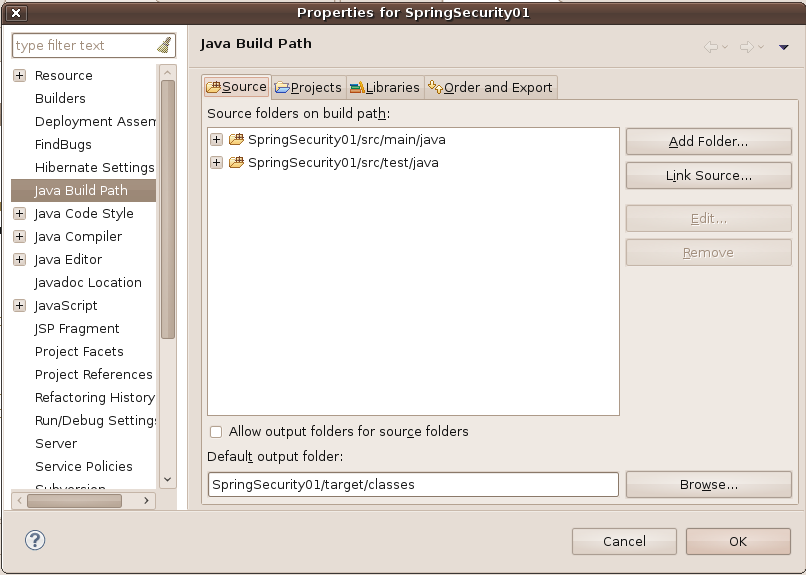
Make sure that ‘src/main/java’ and ‘test/main/java’ are your source folders on building path and default output folder is ‘target/classes’.
Complete Eclipse project can be downloaded here:
Configure Maven
Maven configuration is in ‘pom.xml’ file. It consists of:
- list of ‘repositories’
- list of ‘pluginRepositories’
- list of ‘dependencies’
- ‘build’ settings, i.e., ‘resources’ and ‘plugins’
- list of ‘plugins’
Make sure that:
- ‘packaging’ is set to ‘war’
Crucial plugins
maven-war-plugin. The WAR Plugin is responsible for collecting all artifact dependencies, classes and resources of the web application and packaging them into a web application archive.
<plugin>
	<groupId>org.apache.maven.plugins</groupId>
	<artifactId>maven-war-plugin</artifactId>
	<configuration>
		<archive>
			<manifest>
				<addClasspath>true</addClasspath>
				<classpathPrefix>lib/</classpathPrefix>
			</manifest>
		</archive>
		<webResources>
			<resource>
				<!-- this is relative to the pom.xml directory -->
				<directory>src/main/webapp</directory>
				<targetPath>/</targetPath>
				<!-- enable filtering -->
				<filtering>false</filtering>
			</resource>
		</webResources>
	</configuration>
</plugin>maven-jetty-plugin. In order to run Jetty on a webapp project which is structured according to the usual Maven defaults.
<plugin>
	<groupId>org.mortbay.jetty</groupId>
	<artifactId>maven-jetty-plugin</artifactId>
	<version>6.1.10</version>
	<configuration>
		<scanIntervalSeconds>5</scanIntervalSeconds>
		<stopKey>stop</stopKey>
		<stopPort>9999</stopPort>
		<scanTargets>
			<scanTarget>src/</scanTarget>
		</scanTargets>
	</configuration>
</plugin>
pom.xml
Configuration of ‘pom.xml‘ is presented below:
<?xml version="1.0" encoding="UTF-8"?>
<project xmlns="http://maven.apache.org/POM/4.0.0" xmlns:xsi="http://www.w3.org/2001/XMLSchema-instance"
	xsi:schemaLocation="http://maven.apache.org/POM/4.0.0 http://maven.apache.org/xsd/maven-4.0.0.xsd">
	<modelVersion>4.0.0</modelVersion>
	<groupId>net.zabuchy</groupId>
	<artifactId>SpringSecurity</artifactId>
	<version>0.1</version>
	<packaging>war</packaging>
	<name>SpringSecurity</name>
	<url>http://www.zabuchy.net</url>
	<properties>
		<project.build.sourceEncoding>UTF-8</project.build.sourceEncoding>
	</properties>
	<repositories>
		<repository>
			<id>central</id>
			<name>Maven Repository Switchboard</name>
			<layout>default</layout>
			<url>http://repo1.maven.org/maven2</url>
			<snapshots>
				<enabled>false</enabled>
			</snapshots>
		</repository>
		<!-- I know people complains about java.net repository, but it solves dependencies
			to JEE so... -->
		<repository>
			<id>java.net</id>
			<name>Java.net Maven Repository</name>
			<url>http://download.java.net/maven/2</url>
			<releases>
				<enabled>true</enabled>
				<updatePolicy>always</updatePolicy>
				<checksumPolicy>warn</checksumPolicy>
			</releases>
			<snapshots>
				<enabled>false</enabled>
				<updatePolicy>never</updatePolicy>
				<checksumPolicy>fail</checksumPolicy>
			</snapshots>
		</repository>
		<repository>
			<id>jboss-public-repository-group</id>
			<name>JBoss Public Repository Group</name>
			<url>http://repository.jboss.org/nexus/content/groups/public/</url>
			<layout>default</layout>
			<releases>
				<enabled>true</enabled>
				<updatePolicy>never</updatePolicy>
			</releases>
			<snapshots>
				<enabled>true</enabled>
				<updatePolicy>never</updatePolicy>
			</snapshots>
		</repository>
		<repository>
			<id>com.springsource.repository.bundles.release</id>
			<name>SpringSource Enterprise Bundle Repository - SpringSource Bundle Releases</name>
			<url>http://repository.springsource.com/maven/bundles/release</url>
		</repository>
		<repository>
			<id>com.springsource.repository.bundles.external</id>
			<name>SpringSource Enterprise Bundle Repository - External Bundle Releases</name>
			<url>http://repository.springsource.com/maven/bundles/external</url>
		</repository>
		<repository>
			<id>com.springsource.repository.libraries.release</id>
			<name>SpringSource Enterprise Bundle Repository - SpringSource Library Releases</name>
			<url>http://repository.springsource.com/maven/libraries/release</url>
		</repository>
		<repository>
			<id>com.springsource.repository.libraries.external</id>
			<name>SpringSource Enterprise Bundle Repository - External Library Releases</name>
			<url>http://repository.springsource.com/maven/libraries/external</url>
		</repository>
		<repository>
			<id>org.springframework.security</id>
			<name>Spring Security</name>
			<url>http://maven.springframework.org/snapshot</url>
		</repository>

	</repositories>
	<pluginRepositories>
		<pluginRepository>
			<id>jboss-public-repository-group</id>
			<name>JBoss Public Repository Group</name>
			<url>http://repository.jboss.org/nexus/content/groups/public/</url>
			<releases>
				<enabled>true</enabled>
			</releases>
			<snapshots>
				<enabled>true</enabled>
			</snapshots>
		</pluginRepository>
	</pluginRepositories>
	<!-- Please add dependencies alphabetically so we can detect duplicates -->
	<dependencies>
		<dependency>
			<groupId>cglib</groupId>
			<artifactId>cglib-nodep</artifactId>
			<version>2.2</version>
		</dependency>
		<dependency>
			<groupId>commons-collections</groupId>
			<artifactId>commons-collections</artifactId>
			<version>3.2.1</version>
		</dependency>
		<dependency>
			<groupId>com.jgeppert.struts2.jquery</groupId>
			<artifactId>struts2-jquery-plugin</artifactId>
			<version>2.4.0</version>
		</dependency>
		<dependency>
			<groupId>javassist</groupId>
			<artifactId>javassist</artifactId>
			<version>3.8.0.GA</version>
		</dependency>
		<dependency>
			<groupId>javax.servlet.jsp</groupId>
			<artifactId>jsp-api</artifactId>
			<version>2.0</version>
		</dependency>
		<dependency>
			<groupId>javax.servlet</groupId>
			<artifactId>servlet-api</artifactId>
			<version>2.5</version>
		</dependency>
		<dependency>
			<groupId>junit</groupId>
			<artifactId>junit</artifactId>
			<version>4.8.1</version>
		</dependency>
		<dependency>
			<groupId>javax.servlet.jsp</groupId>
			<artifactId>jsp-api</artifactId>
			<version>2.0</version>
		</dependency>
		<dependency>
			<groupId>log4j</groupId>
			<artifactId>log4j</artifactId>
			<version>1.2.16</version>
		</dependency>
		<dependency>
			<groupId>org.apache.struts</groupId>
			<artifactId>struts2-core</artifactId>
			<version>2.2.1</version>
		</dependency>
		<dependency>
			<groupId>org.apache.struts</groupId>
			<artifactId>struts2-json-plugin</artifactId>
			<version>2.2.1</version>
		</dependency>
		<dependency>
			<groupId>org.apache.struts</groupId>
			<artifactId>struts2-spring-plugin</artifactId>
			<version>2.2.1</version>
		</dependency>
		<dependency>
			<groupId>org.hibernate</groupId>
			<artifactId>hibernate-annotations</artifactId>
			<version>3.5.6-Final</version>
		</dependency>
		<dependency>
			<groupId>org.hibernate</groupId>
			<artifactId>hibernate-core</artifactId>
			<version>3.5.6-Final</version>
		</dependency>
		<dependency>
			<groupId>mysql</groupId>
			<artifactId>mysql-connector-java</artifactId>
			<version>5.1.13</version>
		</dependency>
		<dependency>
			<groupId>org.slf4j</groupId>
			<artifactId>slf4j-api</artifactId>
			<version>1.6.1</version>
		</dependency>
		<dependency>
			<groupId>org.slf4j</groupId>
			<artifactId>slf4j-simple</artifactId>
			<version>1.6.1</version>
		</dependency>
		<dependency>
			<groupId>org.springframework</groupId>
			<artifactId>spring-beans</artifactId>
			<version>3.0.4.RELEASE</version>
		</dependency>
		<dependency>
			<groupId>org.springframework</groupId>
			<artifactId>spring-context</artifactId>
			<version>3.0.4.RELEASE</version>
		</dependency>
		<dependency>
			<groupId>org.springframework</groupId>
			<artifactId>spring-core</artifactId>
			<version>3.0.4.RELEASE</version>
		</dependency>
		<dependency>
			<groupId>org.springframework</groupId>
			<artifactId>spring-orm</artifactId>
			<version>3.0.4.RELEASE</version>
		</dependency>
		<dependency>
			<groupId>org.springframework</groupId>
			<artifactId>spring-test</artifactId>
			<version>3.0.4.RELEASE</version>
		</dependency>
		<dependency>
			<groupId>org.springframework</groupId>
			<artifactId>spring-web</artifactId>
			<version>3.0.4.RELEASE</version>
		</dependency>
		<dependency>
			<groupId>org.springframework.security</groupId>
			<artifactId>spring-security-core</artifactId>
			<version>3.0.6.CI-SNAPSHOT</version>
		</dependency>
		<dependency>
			<groupId>org.springframework.security</groupId>
			<artifactId>spring-security-config</artifactId>
			<version>3.0.6.CI-SNAPSHOT</version>
		</dependency>
		<dependency>
			<groupId>org.springframework.security</groupId>
			<artifactId>spring-security-web</artifactId>
			<version>3.0.6.CI-SNAPSHOT</version>
		</dependency>
	</dependencies>

	<build>
		<resources>
			<resource>
				<directory>src/main/resources</directory>
				<filtering>false</filtering>
			</resource>
		</resources>
		<plugins>
			<plugin>
				<groupId>org.apache.maven.plugins</groupId>
				<artifactId>maven-compiler-plugin</artifactId>
				<configuration>
					<source>1.6</source>
					<target>1.6</target>
				</configuration>
			</plugin>
			<plugin>
				<groupId>org.apache.maven.plugins</groupId>
				<artifactId>maven-war-plugin</artifactId>
				<configuration>
					<archive>
						<manifest>
							<addClasspath>true</addClasspath>
							<classpathPrefix>lib/</classpathPrefix>
						</manifest>
					</archive>
					<webResources>
						<resource>
							<!-- this is relative to the pom.xml directory -->
							<directory>src/main/webapp</directory>
							<targetPath>/</targetPath>
							<!-- enable filtering -->
							<filtering>false</filtering>
						</resource>
					</webResources>
				</configuration>
			</plugin>
			<plugin>
				<groupId>org.mortbay.jetty</groupId>
				<artifactId>maven-jetty-plugin</artifactId>
				<version>6.1.10</version>
				<configuration>
					<scanIntervalSeconds>5</scanIntervalSeconds>
					<stopKey>stop</stopKey>
					<stopPort>9999</stopPort>
					<scanTargets>
						<scanTarget>src/</scanTarget>
					</scanTargets>
				</configuration>
			</plugin>
		</plugins>
	</build>
</project>
Configure Deployment Descriptor
Configuration of ‘web.xml‘ is presented below:
<?xml version="1.0" encoding="UTF-8"?>
<web-app id="WebApp_ID" version="2.4"
	xmlns="http://java.sun.com/xml/ns/j2ee" xmlns:xsi="http://www.w3.org/2001/XMLSchema-instance"
	xsi:schemaLocation="http://java.sun.com/xml/ns/j2ee http://java.sun.com/xml/ns/j2ee/web-app_2_4.xsd">

	<display-name>SpringSecurity</display-name>

	<!-- Struts2 filter -->
	<filter>
		<filter-name>struts2</filter-name>
		<filter-class>org.apache.struts2.dispatcher.ng.filter.StrutsPrepareAndExecuteFilter</filter-class>
	</filter>
	<filter-mapping>
		<filter-name>struts2</filter-name>
		<url-pattern>*.action</url-pattern>
	</filter-mapping>
	<filter-mapping>
		<filter-name>struts2</filter-name>
		<url-pattern>/struts/*</url-pattern>
	</filter-mapping>

	<!-- Spring beans -->
	<context-param>
		<param-name>contextConfigLocation</param-name>
		<param-value>
		/WEB-INF/resources/applicationContext.xml
		</param-value>
	</context-param>

	<!-- log4j -->
	<context-param>
		<param-name>log4jConfigLocation</param-name>
		<param-value>/WEB-INF/resources/log4j.properties</param-value>
	</context-param>

	<listener>
		<listener-class>org.springframework.web.util.Log4jConfigListener</listener-class>
	</listener>
	<listener>
		<listener-class>org.springframework.web.context.ContextLoaderListener</listener-class>
	</listener>
	<listener>
		<listener-class>org.springframework.web.context.request.RequestContextListener</listener-class>
	</listener>

	<welcome-file-list>
		<welcome-file>index.jsp</welcome-file>
	</welcome-file-list>
</web-app>
Configure log4j
Configuration of ‘log4j.properties‘ is presented below:
### direct log messages to stdout ###
log4j.rootLogger=ERROR, file

log4j.appender.console=org.apache.log4j.ConsoleAppender
log4j.appender.console.Target=System.out
log4j.appender.console.layout=org.apache.log4j.PatternLayout
log4j.appender.console.layout.ConversionPattern=%6p | %d | %F | %M | %L | %m%n

# AdminFileAppender - used to log messages in the admin.log file.
log4j.appender.file=org.apache.log4j.FileAppender
log4j.appender.file.File=target/SpringSecurity.log
log4j.appender.file.layout=org.apache.log4j.PatternLayout
log4j.appender.file.layout.ConversionPattern=%6p | %d | %F | %M | %L | %m%n

log4j.logger.net.zabuchy=DEBUG, console
Configure Spring beans
Configuration of Spring beans should be placed in ‘applicationContext.xml’ file. In this project Spring beans configuration files were included in ‘applicationContext.xml’ file. ‘beans.xml’ defines ‘outcomeAction’ bean, which represents Struts2 action and other beans required by this action, i.e., ‘outcomeDeterminer’. ‘databaseBeans.xml’ includes configuration of beans required by Hibernate. ‘dataSource’ bean includes configuration of database to be used in this project. It should be changed accordingly. ‘sessionFactory’ bean includes configuration of Hibernate like dataSource (pointing to ‘dataSource’ bean) and packagesToScan for @Entity beans. Content of the files is presented below.
‘applicationContext.xml‘ file
<?xml version="1.0" encoding="UTF-8"?>
<beans xmlns="http://www.springframework.org/schema/beans"
	xmlns:xsi="http://www.w3.org/2001/XMLSchema-instance"
	xsi:schemaLocation="http://www.springframework.org/schema/beans   http://www.springframework.org/schema/beans/spring-beans-2.5.xsd">

	<import resource="spring/beans.xml" />
	<import resource="spring/databaseBeans.xml" />

</beans>‘spring/beans.xml‘ file
<?xml version="1.0" encoding="UTF-8"?>
<beans xmlns="http://www.springframework.org/schema/beans"
	xmlns:aop="http://www.springframework.org/schema/aop" xmlns:xsi="http://www.w3.org/2001/XMLSchema-instance"
	xsi:schemaLocation="http://www.springframework.org/schema/beans   http://www.springframework.org/schema/beans/spring-beans-3.0.xsd  http://www.springframework.org/schema/aop   http://www.springframework.org/schema/aop/spring-aop-3.0.xsd">

	<bean class="net.zabuchy.actions.OutcomeAction" id="outcomeAction"
		scope="session">
		<property name="outcomeDeterminer" ref="outcomeDeterminer" />
		<aop:scoped-proxy />
	</bean>

	<bean class="net.zabuchy.business.OutcomeDeterminer" id="outcomeDeterminer">
		<aop:scoped-proxy />
	</bean>

</beans>‘spring/databaseBeans.xml‘ file
<?xml version="1.0" encoding="UTF-8"?>
<beans xmlns="http://www.springframework.org/schema/beans"
	xmlns:xsi="http://www.w3.org/2001/XMLSchema-instance"
	xsi:schemaLocation="http://www.springframework.org/schema/beans  http://www.springframework.org/schema/beans/spring-beans-2.5.xsd">

	<!-- Data source configuration -->
	<bean class="org.springframework.jdbc.datasource.DriverManagerDataSource"
		id="dataSource">
		<property name="driverClassName" value="com.mysql.jdbc.Driver" />
		<property name="url" value="jdbc:mysql://127.0.0.1:3306/db" />
		<property name="username" value="test" />
		<property name="password" value="test" />
	</bean>

	<!-- Hibernate session factory -->
	<bean
		class="org.springframework.orm.hibernate3.annotation.AnnotationSessionFactoryBean"
		id="sessionFactory">
		<property name="dataSource">
			<ref bean="dataSource" />
		</property>
		<property name="hibernateProperties">
			<props>
				<prop key="hibernate.dialect">org.hibernate.dialect.MySQLDialect</prop>
				<!-- In prod set to "validate", in test set to "create-drop" -->
				<prop key="hibernate.hbm2ddl.auto">update</prop>
				<!-- In prod set to "false" -->
				<prop key="hibernate.show_sql">false</prop>
				<!-- In prod set to "false" -->
				<prop key="hibernate.format_sql">true</prop>
				<!-- In prod set to "false" -->
				<prop key="hibernate.use_sql_comments">true</prop>
				<!-- In prod set to "false", in test set to "true" -->
				<prop key="hibernate.cache.use_second_level_cache">false</prop>
			</props>
		</property>
		<property name="packagesToScan" value="net.zabuchy" />
	</bean>

</beans>
Configure Struts2 actions
Struts2 actions are defined in ‘struts.xml‘ file, which is presented below. ‘getOutcome’ action uses ‘outcomeAction’ bean configuration and invokes ‘getOutcome’ method from this bean. If ‘getOutcome’ method returns ‘success’,'success.jsp’ will be displayed. If ‘getOutcome’ method returns ‘error’,'error.jsp’ will be displayed.
<?xml version="1.0" encoding="UTF-8"?>
<!DOCTYPE struts PUBLIC "-//Apache Software Foundation//DTD Struts Configuration 2.0//EN"
                        "http://struts.apache.org/dtds/struts-2.0.dtd">
<struts>
	<constant name="struts.devMode" value="true" />
	<package extends="struts-default" name="default">

		<global-results>
			<result name="error">error.jsp</result>
		</global-results>

		<action class="outcomeAction" method="getOutcome" name="getOutcome">
			<result name="success">/WEB-INF/content/success.jsp</result>
		</action>

	</package>
</struts>
Implement Java classes
Sample Java classes code, which was used in this project is presented below. Two classes were created and defined as Spring beans in ‘beans.xml’ file: ‘OutcomeAction’, which is Struts2 action and ‘OutcomeDeterminer’, which is class used by this action.
‘OutcomeAction.java‘ file in package net.zabuchy.actions
package net.zabuchy.actions;

import net.zabuchy.business.OutcomeDeterminer;
import org.apache.struts2.dispatcher.DefaultActionSupport;

public class OutcomeAction extends DefaultActionSupport {
	private static final long serialVersionUID = 4794228472575863567L;

	private OutcomeDeterminer outcomeDeterminer;

	public String getOutcome() {
		return outcomeDeterminer.getOutcome();
	}

	public OutcomeDeterminer getOutcomeDeterminer() {
		return outcomeDeterminer;
	}

	public void setOutcomeDeterminer(OutcomeDeterminer outcomeDeterminer) {
		this.outcomeDeterminer = outcomeDeterminer;
	}
}‘OutcomeDeterminer.java‘ file in package net.zabuchy.business
package net.zabuchy.business;

import java.util.Random;
import org.apache.log4j.Logger;

public class OutcomeDeterminer {

	private static final Logger logger = Logger.getLogger(OutcomeDeterminer.class
			.getName());

	private Random generator;

	public OutcomeDeterminer() {
		generator = new Random();
	}

	public String getOutcome() {
		int randomNumber = generator.nextInt(5);
		if (logger.isDebugEnabled()) {
			logger.debug("Random number is: " + randomNumber);
		}

		if (randomNumber == 0) {
			return "error";
		}
		return "success";
	}
}
Add libraries to Eclipse
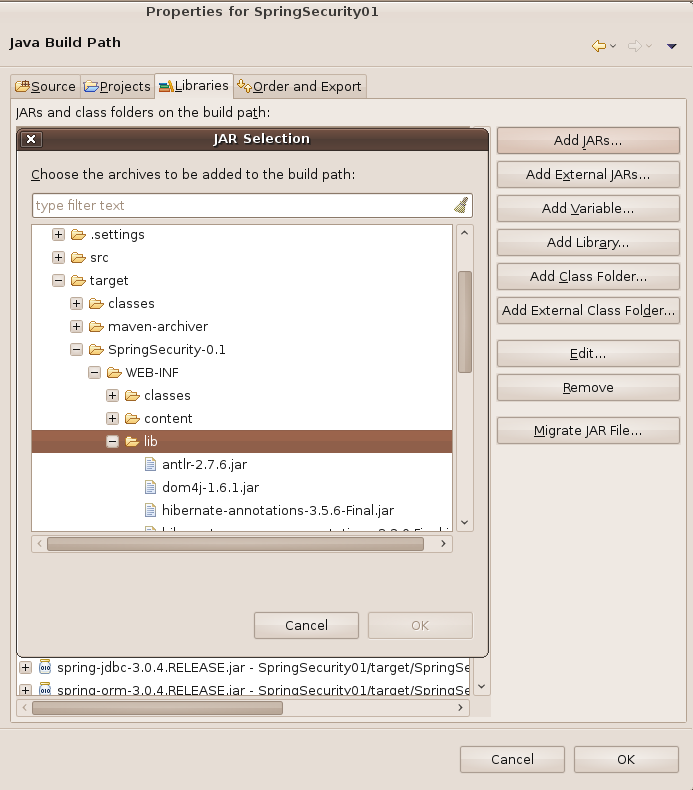
The easiest way to add required libraries to Eclipse is allow Maven to download all the required libraries (defined as dependencies in pom.xml) and add them to ‘Referenced Libraries’. In order to do so in root directory of the application run:
mvn packageThis command should build war package to be deployed on web server including:
- downloading required libraries and coping them to ‘target/{projectName}/WEB-INF/lib’ (configured in ‘manifest’ section of maven-war-plugin)
- compiling classes and coping them to ‘target/{projectName}/WEB-INF/classes’
- coping files from ‘src/main/resource’ to ‘target/{projectName}/WEB-INF/classes’
- coping files from ‘src/main/webapp’ to ‘target/{projectName}’ (configured in ‘webResources’ section of maven-war-plugin)

In Eclipse add libraries from ‘target/{projectName}/WEB-INF/lib’ to build path. It might be required to move them to the top ‘Order and Export’.
Run application
We are going to use jetty server to run the application. ‘jetty:run’ command allows the automatic reloads, so during development the changes done in Eclipse are automatically deployed to the server. In order to run the application type:
mvn jetty:runmaven-jetty-plugin automatically scans ‘src’ (configured in ‘scanTargets’ section of maven-jetty-plugin) every 5 seconds (configured in ‘scanIntervalSeconds’ section of maven-jetty-plugin) for changes.
To deploy the project on different web server, e.g., Tomcat, just use ‘mvn package’ command and copy war file to appropriate directory on your Tomcat server.
In your web browser access the following link: ‘http://localhost:8080/SpringSecurity/getOutcome.action’. You should be able to see either success or error page.


