This is part 2 of the Java Technologies Integration tutorial.
Integration with Spring and Hibernate
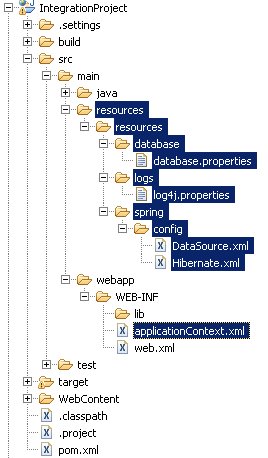
In order to integrate the project with Spring and Hibernate a number of the files presented in Figure 5 have to be created. The content of the files is presented in the following part of this section.

database.properties
This file includes information used to connect to database. We use MySQL database to store our data. Make sure that jdbc.url, jdbc.username, and jdbc.password are updated with your settings.
jdbc.driverClassName=com.mysql.jdbc.Driver
jdbc.url=jdbc:mysql://<strong>127.0.0.1:3306/IntegrationProject</strong>
jdbc.username=<strong>integrationProjectUser</strong>
jdbc.password=<strong>integrationProjectPassword</strong>
log4j.properties
This file includes information used to log the data. For more information refer to log4j. Again, replace bold values with the correct settings.
### direct log messages to stdout ###
log4j.rootLogger=ERROR, console, file

log4j.appender.console=org.apache.log4j.ConsoleAppender
log4j.appender.console.Target=System.out
log4j.appender.console.layout=org.apache.log4j.SimpleLayout

# AdminFileAppender - used to log messages in the admin.log file.
log4j.appender.file=org.apache.log4j.FileAppender
log4j.appender.file.File=<strong>path_to_your_log_directory</strong>/IntegrationProject.log
log4j.appender.file.layout=org.apache.log4j.SimpleLayout

log4j.logger.com.frogdroid=DEBUG, console, file
DataSource.xml
Spring Bean defined to connect to database.
<beans xmlns="http://www.springframework.org/schema/beans"
	xmlns:xsi="http://www.w3.org/2001/XMLSchema-instance"
	xsi:schemaLocation="http://www.springframework.org/schema/beans
	http://www.springframework.org/schema/beans/spring-beans-2.5.xsd">

	<bean class="org.springframework.beans.factory.config.PropertyPlaceholderConfigurer">
		<property name="location">
			<value>WEB-INF/classes/resources/database/database.properties</value>
		</property>
	</bean>

	<bean id="dataSource" class="org.springframework.jdbc.datasource.DriverManagerDataSource">
		<property name="driverClassName" value="${jdbc.driverClassName}" />
		<property name="url" value="${jdbc.url}" />
		<property name="username" value="${jdbc.username}" />
		<property name="password" value="${jdbc.password}" />
	</bean>

</beans>
Hibernate.xml
Spring Bean defined to create session factory for hibernate.
<beans xmlns="http://www.springframework.org/schema/beans"
	xmlns:xsi="http://www.w3.org/2001/XMLSchema-instance"
	xsi:schemaLocation="http://www.springframework.org/schema/beans
	http://www.springframework.org/schema/beans/spring-beans-2.5.xsd">

	<!-- Hibernate session factory -->
	<bean id="sessionFactory" class="org.springframework.orm.hibernate3.LocalSessionFactoryBean">

		<property name="dataSource">
			<ref bean="dataSource" />
		</property>

		<property name="hibernateProperties">
			<props>
				<prop key="hibernate.dialect">org.hibernate.dialect.MySQLDialect</prop>
				<prop key="hibernate.show_sql">true</prop>
			</props>
		</property>

		<property name="mappingResources">
			<list />
		</property>

	</bean>
</beans>
applicationContext.xml
This file is used by Spring to create appropriate Spring Beans. For convenience it includes imports of appropriate files with Spring Beans. applicationContext.xml is default name and can be changed in web.xml file.
<beans xmlns="http://www.springframework.org/schema/beans"
	xmlns:xsi="http://www.w3.org/2001/XMLSchema-instance"
	xsi:schemaLocation="http://www.springframework.org/schema/beans
	http://www.springframework.org/schema/beans/spring-beans-2.5.xsd">

	<!-- Database Configuration -->
	<import resource="classes/resources/spring/config/DataSource.xml" />
	<import resource="classes/resources/spring/config/Hibernate.xml" />

</beans>
Updates to web.xml
In order to enable the integration the following changes should be done to web.xml file.
<?xml version="1.0" encoding="UTF-8"?>
<web-app id="WebApp_ID" version="2.4"
	xmlns="http://java.sun.com/xml/ns/j2ee"
	xmlns:xsi="http://www.w3.org/2001/XMLSchema-instance"
	xsi:schemaLocation="http://java.sun.com/xml/ns/j2ee
	http://java.sun.com/xml/ns/j2ee/web-app_2_4.xsd">

	<display-name>IntegrationProject</display-name>

	<!-- Spring beans -->
	<context-param>
		<param-name>contextConfigLocation</param-name>
		<param-value>/WEB-INF/applicationContext.xml </param-value>
	</context-param>

	<context-param>
		<param-name>log4jConfigLocation</param-name>
		<param-value>/WEB-INF/classes/resources/logs/log4j.properties</param-value>
	</context-param>

	<listener>
		<listener-class>org.springframework.web.util.Log4jConfigListener</listener-class>
	</listener>

	<listener>
		<listener-class>org.springframework.web.context.ContextLoaderListener</listener-class>
	</listener>

	<welcome-file-list>
		<welcome-file>index.html</welcome-file>
	</welcome-file-list>

</web-app>
Entities
To communicate with database using Hibernate we have to create entities, which are layer between database and business interface of our application. The most convenient way to do that in Eclipse is to add MySQL database to data sources and create entity directly from the table. In order to do so, select:
File -> New -> Connection Profiles -> Connection Profile
Select: MySQL
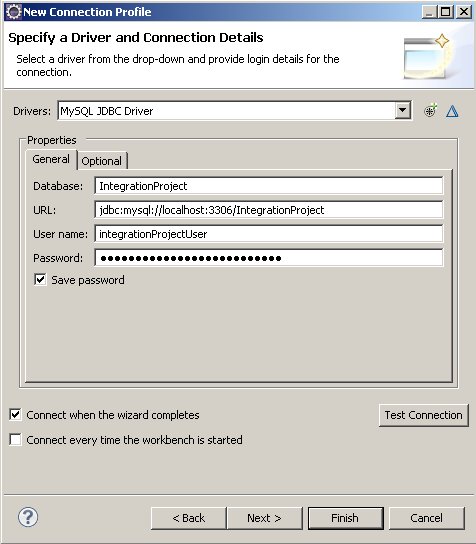
Enter data as shown in Figure 6.

After clicking connect on the database in Data Source Explorer you should be able to see the following view (Figure 7). Note, that our database ‘integrationproject’ includes table ‘users’ which consists of 3 fields: ‘id’, ‘username’, and ‘password’.

Entity creation
To create entity from database table create JPA project:
File -> New -> JPA -> JPA Project
Enter:
Project name: IntegrationProjectJPA
Target runtime: [Tomcat server configured before]
Configuration: Utility JPA Project with Java 5.0Following that select:
File -> New -> JPA -> Entities From Tables
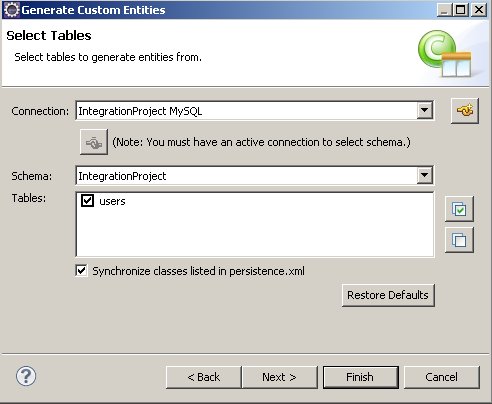
Configure custom entities generation as shown in Figure 8.

Copy User.java file which was created to IntegrateProject under the path src/main/java/com/frogdroid/integration/user/entity/ and fix package name. Remove serialVersionUID variable. The content of User.java file is listed below.
package com.frogdroid.integration.user.entity;

import java.io.Serializable;
import javax.persistence.*;

/**
 * The persistent class for the users database table.
 *
 */
@Entity
@Table(name = "users")
public class User implements Serializable {

    @Id
    private int id;

    private String password;

    private String username;

    public User() {
    }

    public int getId() {
        return this.id;
    }

    public void setId(int id) {
        this.id = id;
    }

    public String getPassword() {
        return this.password;
    }

    public void setPassword(String password) {
        this.password = password;
    }

    public String getUsername() {
        return this.username;
    }

    public void setUsername(String username) {
        this.username = username;
    }

}
XML mapping file creation
We will also need mapping file – it is required by Hibernate factory bean (Hibernate.xml). To create the mapping file select:
File -> New -> Hibernate -> Hibernate XML Mapping File (hbm.xml)
Select: Add Class… and enter: User
Select: User – com.frogdroid.integration.user.entity – IntegrationProject/src/main/java
The file User.hbm.xml will be generated. Copy it to src/main/resources/resources/hibernate/. Change ‘table=”USER”‘ to ‘table=”USERS”‘. If present remove serialVersionUID property. The content of the file is presented below.
<?xml version="1.0"?>
<!DOCTYPE hibernate-mapping PUBLIC "-//Hibernate/Hibernate Mapping DTD 3.0//EN"
"http://hibernate.sourceforge.net/hibernate-mapping-3.0.dtd">

<hibernate-mapping>
    <class name="com.frogdroid.integration.user.entity.User" table="USERS">
        <id name="id" type="int">
            <column name="ID" />
            <generator class="assigned" />
        </id>
        <property name="password" type="java.lang.String">
            <column name="PASSWORD" />
        </property>
        <property name="username" type="java.lang.String">
            <column name="USERNAME" />
        </property>
    </class>
</hibernate-mapping>
Add mapping file to Hibernate configuration file (src/main/resources/resources/spring/config/Hibernate.xml) as follows:
<property name="mappingResources">
	<list>
		<value>resources/hibernate/User.hbm.xml</value>
	</list>
</property>
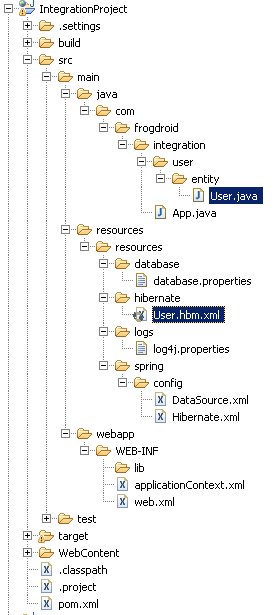
Structure of the project after changes is presented in Figure 9.

Test that everything is working OK so far, run from the directory with pom.xml:
mvn clean
mvn compile
mvn war:war
Part 3 of the tutorial can be found at Java Technologies Integration tutorial – part 3.
Updates to the Hibernate configuration of the project can be found in part 5 of the tutorial, which can be found here Java Technologies Integration tutorial – part 5 – Hibernate update.
