Introduction
The purpose of this tutorial is to demonstrate the technical solution for integration of 4 leading frameworks:
Such a combination allow the development of you web applications with maximal of flexibility and minimal effort. In addition, the integration with SVN will be also demonstrated to enable the efficient development.
Prerequisites
Before we start you need the following tools:
- Tomcat
- MySQL Server
- Eclipse (Eclipse IDE for Java EE Developers)
- Hibernate Tools Plugin (instalation instructions)
- SVN Plugin: Subclipse or SVNKit (from standart Eclipse sites)
Setup
Java
Remember to set the JAVA_HOME environment variable to point to the base path of the JDK.
Tomcat
To install Tomcat follow the instructions in installation guide. Remember to set the CATALINA_HOME environment variable to point to the base path of the Tomcat.
Alternative solution is to use Tomcat servers run in Eclipse. To configure it select:
File -> New -> Server -> Server
Select: Apache -> Tomcat 6.0
Choose Tomcat installation directory and click ‘Download and Install’
Tomcat should be downloaded to the directory you chose and server should appear in server list (Servers tab).
Maven
Download Maven from http://maven.apache.org/download.html and unpack it to local directory. Set environment variable M2_HOME to point to directory with Maven.
MySQL and Database
Install and configure MySQL. Create a database named ‘IntegrationProject’ and run the script below to create the “Users” table.
CREATE TABLE `USERS` (
  `id` INT(11) NOT NULL AUTO_INCREMENT,
  `username` VARCHAR(50) NOT NULL,
  `password` VARCHAR(50) NOT NULL,
  PRIMARY KEY (`id`),
  KEY `username` (`username`)
) ENGINE=MyISAM ;
Development
Having all that set up we can finally start the development! First we have to create Maven project.
Maven project
To create the default Maven project we execute:
mvn archetype:generateMaven downloads number of packages and following that asks about the archetype. Select default one (maven-archetype-quickstart) and define the following values:
Define value for groupId: com.frogdroid.integration
Define value for artifactId: IntegrationProject
Define value for version: 1.0
Define value for package: com.frogdroid.integration
The project should be created!
Eclipse Project
It is possible to tranform Maven project to Eclipse project using command:
mvn eclipse:eclipseHowever, for convenience, our approach is to create Dynamic Web Project in Eclipse and integrate Maven project with it. Such approach allows to use Tomcat server integrated with Eclipse. To create Dynamic Web Project we select:
File -> New -> Web -> Dynamic Web Project
Enter:
Project name: IntegrationProject
Target runtime: [Tomcat server configured before] (or leave empty if you decided not to use Tomcat with Eclipse)
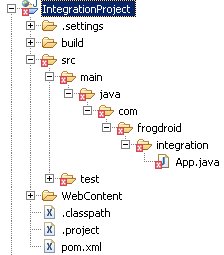
Copy the content of the Maven project into you Ecplise project and refresh it. You should see the structure presented in Figure 1.

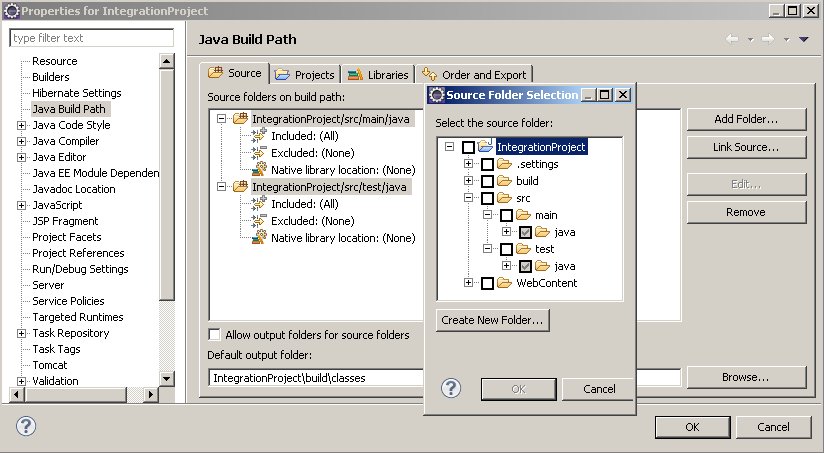
Fix the build path as in Figure 2.

There are still some references to external libraries missing but we will deal with that later.
Configure project dependencies and Maven plugins
Maven is framework that deals with dependencies in our project. The convenient way to find the dependencies to be placed in pom.xml file is to use the Maven repository. The dependencies can be copied directly to pom.xml file. We will use following libraries:
- junit
- spring
- hibernate
- log4j
- struts2-spring-plugin
- struts2-dojo-plugin
- mysql-connector-java
- persistence-api
If the packages depend on different ones they will be downloaded automatically.
It also uses a number of different plugins to make Java application development more convenient.
In our project we use two plugins:
- maven-compiler-plugin to configure java version that should be used to compile the sources
- maven-war-plugin to build war file to be deployed on Tomcat server
pom.xml
The complete pom.xml file is presented below.
<project xmlns="http://maven.apache.org/POM/4.0.0"
        xmlns:xsi="http://www.w3.org/2001/XMLSchema-instance"
        xsi:schemaLocation="http://maven.apache.org/POM/4.0.0
        http://maven.apache.org/xsd/maven-4.0.0.xsd">

	<modelVersion>4.0.0</modelVersion>

	<groupId>com.frogdroid.integration</groupId>
	<artifactId>IntegrationProject</artifactId>
	<version>1.0</version>
	<packaging>jar</packaging>

	<name>IntegrationProject</name>
	<url>http://maven.apache.org</url>

	<properties>
		<project.build.sourceEncoding>UTF-8</project.build.sourceEncoding>
	</properties>

	<dependencies>

		<dependency>
			<groupId>junit</groupId>
			<artifactId>junit</artifactId>
			<version>4.8.1</version>
		</dependency>


		<dependency>
			<groupId>org.springframework</groupId>
			<artifactId>spring</artifactId>
			<version>2.5.6</version>
		</dependency>

		<dependency>
			<groupId>org.hibernate</groupId>
			<artifactId>hibernate</artifactId>
			<version>3.2.7.ga</version>
		</dependency>

		<dependency>
			<groupId>log4j</groupId>
			<artifactId>log4j</artifactId>
			<version>1.2.16</version>
		</dependency>

		<dependency>
			<groupId>org.apache.struts</groupId>
			<artifactId>struts2-spring-plugin</artifactId>
			<version>2.1.8</version>
		</dependency>

		<dependency>
			<groupId>org.apache.struts</groupId>
			<artifactId>struts2-dojo-plugin</artifactId>
			<version>2.2.1</version>
		</dependency>

		<dependency>
			<groupId>mysql</groupId>
			<artifactId>mysql-connector-java</artifactId>
			<version>5.1.13</version>
		</dependency>

		<dependency>
			<groupId>javax.persistence</groupId>
			<artifactId>persistence-api</artifactId>
			<version>1.0</version>
		</dependency>

	</dependencies>

	<build>
		<plugins>

			<plugin>
				<groupId>org.apache.maven.plugins</groupId>
				<artifactId>maven-compiler-plugin</artifactId>
				<configuration>
					<source>1.5</source>
					<target>1.5</target>
				</configuration>
			</plugin>

			<plugin>
				<groupId>org.apache.maven.plugins</groupId>
				<artifactId>maven-war-plugin</artifactId>
				<configuration>
					<archive>
						<manifest>
							<addClasspath>true</addClasspath>
							<classpathPrefix>lib/</classpathPrefix>
						</manifest>
					</archive>
				</configuration>
			</plugin>

		</plugins>
	</build>
</project>
Test dependencies
To download all the dependencies to local repository and test if project compiles execute:
mvn compileMissing artifacts
It might happen that some of the artifacts are missing in the Maven repository, .e.g, javax.transaction:jta:jar:1.0.1B. In that case we can install missing artifact in the local repository manually. To do that download the missing artifact (jar file) and follow the instructions on screen. In case of javax.transaction:jta:jar:1.0.1B it can be downloaded from http://www.oracle.com/technetwork/java/javaee/tech/jta-138684.html (change zip extension to jar) and installed using the following command:
mvn install:install-file -DgroupId=javax.transaction -DartifactId=jta -Dversion=1.0.1B -Dpackaging=jar -Dfile=jta-1_0_1B.jarWeb application development
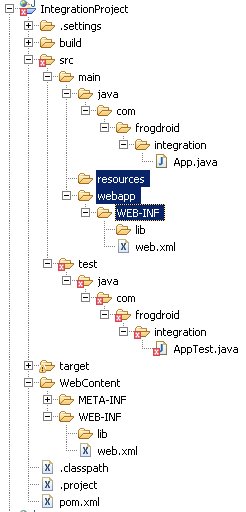
Convinient way to develop Web applications with Maven is to use maven-war-plugin. This plugin enforces special project structure. The web sources should be placed in src/main/webapp folder therefore we have to create src/main/webapp folder in our project. Copy whole directory WebContent/WEB-INF to src/main/webapp/. In addition we create src/main/resources folder. The content of this folder is copied directly in WEB-INF/classes after creation of war file. The file structure is presented in Figure 3.

War file creation
Having all that done we finally can create war file. To do so, execute the following command:
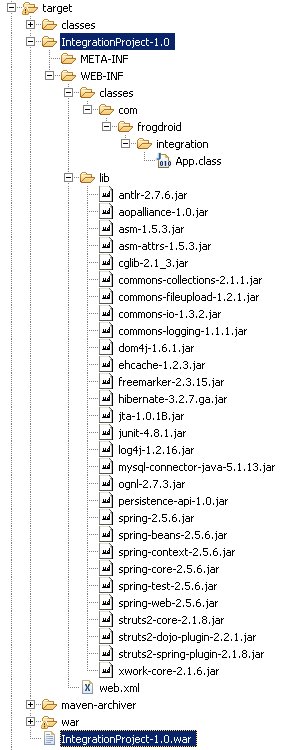
mvn war:warThe file will be created in target directory. That is also the directory where compiled code is put. Compiled java classes can be found in target/classes. Content of war file can be found in our case in target/IntegrationProject-1.0 and the war file itself in target/IntegrationProject-1.0.war. Configuration of maven-war-plugin indicates that directories that project depends on are included and placed in lib directory, so full path to them is target/IntegrationProject-1.0/WEB-INF/lib.
<addClasspath>true</addClasspath>
<classpathPrefix>lib/</classpathPrefix>
The content of target directory after build of war file is presented in Figure 4.

Adding dependencies to Ecplise build path
Having all the libraries needed for the development of the project we can finally add them to Eclipse build path (add external jars). Add jar files located in target/IntegrationProject-1.0/WEB-INF/lib to Java build path. Remember to update build path after adding/removing dependencies to/from pom.xml file.
Part 2 of the tutorial can be found at Java Technologies Integration tutorial – part 2
